Sunday, August 26, 2012

Balance and Weight

Have you ever had a piece of jewelry (or clothing) that just refused to sit on you the way you wanted? Did you fidget with it to set it straight, only to have it shift again and again? Sometimes things do this because they are improperly balanced. Balance is one distinguishing factor between a good piece of jewelry and a bad one.

This may sound snobbish, but I've made enough less-than-stellar bracelets to be convinced of the difference.

Imagine how a simple piece of yarn feels around your wrist. Say that you want the little knot facing up, sitting on the top of your arm. It probably stays there fairly well, with only some shifting.

Now, imagine putting a heavy glass bead on the yarn. Because of it's weight, it will always swing underneath your wrist. If you wanted it on top, then that's bad design, since the bead is not sitting where you want it.

But let's say you DO want it down there. Fine. But now the yarn is kind of tight around the top part of your wrist, and it is uncomfortable. That's bad design. A piece of jewelry should both look and feel just right.

While I'd love to pretend to always make perfect jewelry, I just don't.

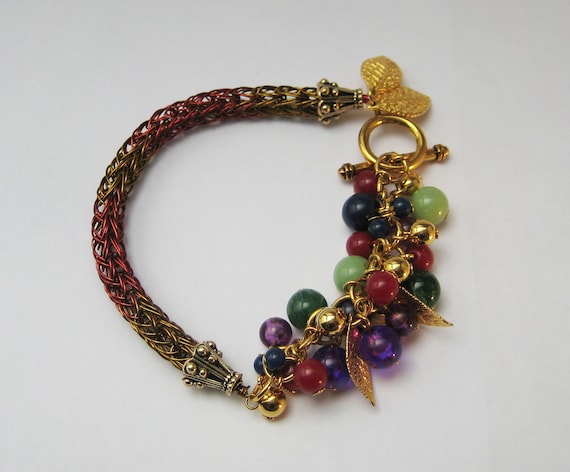
Most of my first bracelets did not have heavy things attached to them, so all this balance stuff was not a problem. My first piece to be heavily accoutered was this one:


It feels great on my wrist. While the bead cluster does tend to fall to the underside of my wrist, it happens slowly, and the VK portion is stiff enough that it keeps the distribution of weight spread out. Yay for me!

On the bracelet below, however, the pearl cluster drags itself down on the wearer's wrist.

Green Viking Knit bracelet with pearls

An otherwise attractive piece, it is not balanced well.

So here is another lesson on my way to actually making perfect jewelry. Or so I hope.

Wednesday, August 15, 2012

Re-purposing Looks Good On You

When I first started making VK, I naturally wove only simple chains. But within a month or two, I could tell I would get bored without other elements to add.

On my second trip to the hobby shop where I usually got my supplies, I bought a small bag of wooden beads. They were fun for a while, but it was a bit monotonous with only those. I wanted more things to play around with, but I did not have a lot of money to spend buying new supplies all the time.

The answer to fixing boredom on the cheap? Used jewelry!


Viking Knit Bracelet with reused autumn beads and leaves


This piece is made from a pair of earrings that I found at a garage sale.

For a while, the earrings sat in my box, lonely, and without purpose. Poor things. But I just didn't know what to do with them! I just hoped that someday they might be useful.

Their time to shine came after I'd woven a double-knit chain of red and gold. It was an experimental color combo, and indeed I didn't know how I was going to finish it off.

I think you can see what happened next. I disassembled and reassembled the earrings into a more bracelet-friendly shape, and attached one end to the chain and the other to a clasp. The earrings even had some gold-colored leaves that I artfully positioned at my whim.


Viking Knit Bracelet with reused autumn beads and leaves


Viking Knit Bracelet with reused autumn beads and leaves


The advantages of using re-purposed jewelry don't stop at their low cost. Not only does it introduce me to other peoples' jewelry design, which stretches my concept of what is possible for me to do, but using old jewelry means that my piece is absolutely unique to any other I might try to make. I will never find earrings like that ever again.

Read my next blog to see how his beautiful experiment taught me something that I'd never thought of before.

Monday, July 23, 2012

Breaking the Rules (Which I've Made Up Anyways)

Here is my silver double knit bracelet from my last blog.


A sharp observer might notice that this piece does not have end caps on the raw ends of the chain like most of my other works. See how the end of the weave just stops right next to the pearls?

"No!" you say, "How criminal to leave the ends uncovered! It defies all sense!" Or maybe that's just what my inner control freak says, since I've never made a piece this way before.

There is a method to my madness, though.

I tend to design by my gut -- if I'm not pleased with a look, I will try something else.
When I was finishing this breacelet, I put the bead caps on to see how it fit, and the bead caps seemed too large to me, like when a little kid tries on a full-sized hard hat. So I fiddled with the combination of beads and end caps and clasp until I reached a look that satisfied me.


It may be a matter of taste, but I think my rebellion was not without success.


Tuesday, July 10, 2012

Double-Knit Explained

This next bracelet was an experiment in the thinner 26-gauge wire. Thinner wire is more flexible, and so allows for a chain with a smaller diameter, more flexibility, and double- or triple-knit weave.


Double knit looks more dense than single knit. People sometimes think "double" refers to two wires being woven at the same time. It actually means that one wire is wrapped around a "row" twice. I make my loops around my dowel like I would for a single knit, but when I finish going all the way around, I make a second set of loops around the ones I just made. After completing this, I start on another "row."

It can be a tricky technique because it is easier to make a mistake in the bramble of wire it makes! But I enjoyed the challenge, and maybe someday I will even try triple knit.


Check out my next blog to learn more about how I finished this piece.

Thursday, June 28, 2012

Serendipity Put to Work

It screamed at me: aqua blue wire and aqua blue beads. I had been searching for two separate supplies, wire and clasps, and here were two that matched perfectly. How could I leave the store without them?

Well, when I got them home, I had a problem. I only had 2 clasps and enough wire for two bracelets. This meant that I only had two chances to make something out of my good luck.

No pressure. Not.

For a little while, all I had the courage to put together was a bracelet with no extra adornments. Then when I was only faced with one more option, I became a bit paralyzed. I didn't want to mess up my last shot, but I also didn't want to settle for making another plain bracelet. 

The end of the story is that I realized I was being silly, and I just went for it.

Below are photos of the two bracelets sitting on my wrist. 


As you can see, I chose to compliment and expand on the dark brown of the clasp with the variations of brown in some wooden beads. Here are some close-ups of the chain itself.


An additional lesson: in a past bracelet (see here), I introduced beads into the weave without damaging the chain. In that bracelet, the beads were visible between the wires, which I think was successful for the design. In the blue bracelet above, the beads are starting to "hide" in the weave. This was not what I had planned on. Whether or not it makes for a successful design is up to you to decide.


Thursday, June 21, 2012

Taking a Chance

After trying beads once before on a piece (see the copper bracelet from this post), I wanted to try a different look. I aimed for a more elegant and flashy design.

Here is the product, a bracelet made with 24-gauge silver colored wire and black and red czech glass beads.


I read somewhere that it is inadvisable to pull the wire chain through the draw plate when you have woven beads into it. (If you don't know what I'm talking about, see the terminology bullet points.) However, I have done exactly that with this piece. I was nervous to do so, because, it IS in fact, a bit inadvisable.

Why? The beads could have warped the wire mesh, making it messy-looking. (That may have been OK, or it may have been just ugly.) There was also a slim chance that I could have broken the chain trying to pull it through the draw plate.

But what brave Viking doesn't take some crazy chances once in a while?


Wednesday, June 13, 2012

Learning Length


In making my second necklace (single knit, without a pendant), I had to overcome an error -- I had made the knitted section too short. As I have said, VK is a fairly forgiving technique, but there is a point past which you cannot add more material to the end of a length you have already made. 

So, I had reached that point of no return when I realized my mistake. What to do? It was too long to be a bracelet, and too short even for my skinny neck.

Thankfully, I had some beads on hand. The brown wooden beads coordinated fairly well with the bronze-colored copper wire. As you can see in the photos below, I simply strung a few beads on a single length of wire at the end of the knitted portion.


This is not the most symmetrical solution, but it serves its purpose. The asymmetry might in fact be a useful (and purposeful) design element in future pieces. Nonetheless, in the face of a piece that I have made too short, I think that this isn't a bad answer.